
0538-5089056


0538-5089056
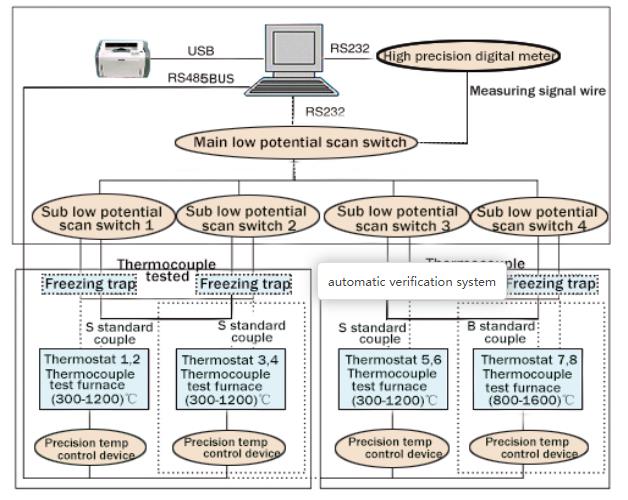
The thermocouple calibration furnace is suitable for the constant temperature equipment of various types of standard thermocouples, noble metal thermocouples and base metal thermocouples. If you need to verify S/R/B, or K/N/E/J/T thermocouples and issue corresponding calibration reports, you need a complete set of thermocouple calibration system, which includes low potential scanners, intelligent It is composed of temperature control unit, terminal block, calibration software package, cold junction automatic compensation sensor, temperature transmitter, system control cabinet, electrical measuring equipment department, high-precision digital multimeter, etc. If the bid is established, more supporting equipment will be required. If you need more information, please contact us below.
Today we only briefly introduce How does a Thermocouple Calibration Furnace work?At the same time, you can click the text below to understand the relevant content.
Thermocouple Calibration Furnace Price List
Technical Requirements for Thermocouple Calibration Furnace

Thermocouple calibration furnace calibration process
1. Generally speaking, for thermocouples with a measurement temperature higher than 300 degrees Celsius, the thermocouple calibration system is mainly composed of a tube type calibration furnace, a freezing point tank, a switch, a potentiometer, and a standard thermocouple.
2. The tube calibration furnace requires a stable temperature field in the tube, preferably with a constant temperature zone of about 100mm, and the temperature change during reading does not exceed 0.2C/mino. Generally, the temperature of the calibration point is changed by adjusting the autotransformer and changing the voltage. However, the thyristor is generally controlled by an automatic temperature control device, and the accuracy level of the potentiometer should not be lower than 0.05.
3. When calibrating, put the hot end of the thermocouple to be calibrated and the standard thermocouple marked with S into the tube calibration furnace, and compare the measurement data of the two. When calibrating K and E thermocouples, it is necessary to put on quartz sleeves, then bind them with the thermocouples to be calibrated with nickel wires, and then insert them into the constant temperature zone of the tube calibration furnace. In order to ensure that the temperature of the hot end of the calibrated thermocouple is consistent with that of the standard thermocouple, it is best to place the hot ends of the standard thermocouple and the measured thermocouple in the two holes of the metal nickel block, and then place the nickel block for calibration work. It is carried out in the constant temperature zone of the furnace.
4. After the thermocouple is placed in the constant temperature zone of the calibration furnace, the mouth of the calibration furnace must be blocked with asbestos rope. The insertion depth of the thermocouple is usually 300mm, and the shorter thermocouple can be reduced, but not less than 150mm. Place the end of the thermocouple in the freezer to ensure OC. When the temperature of the calibration furnace reaches the 10C range of the calibration temperature point, ensure that the temperature change does not exceed 0.2"C/min, and then the thermoelectromotive force of the thermocouple can be measured.
5. At each calibration temperature point, the thermal electromotive force readings of the standard thermocouple and the calibrated thermocouple should meet the standard→calibration 1→…→calibration n→…→calibration 1→standard, and the readings must be greater than 4 times. Then take the average and check the index table. Finally, the temperature error is obtained by comparison.
All the above information is the content about thermocouple calibrator, working principle of thermocouple calibrator and thermocouple calibration method recommended by Xiaobian this time. I hope you will like it and want to know more about thermocouple calibrator. For information or other content, please pay attention to our website.
| Previous:How does a calibration bath work? | next:Lanterns Reflect Our Original Aspiration · Precision Ensures Reunion | DEARTO Wishes You a Peaceful Lantern Festival |
 Headquarter Address :Tai'an High-tech Development Zone, Shandong Province
Telephon :+86 0538-5089056 +86 13953856217
Fax : +86 0538-5059718
After sale:+86 0538-5050959
Website : www.tadt.com.cn
E-mail : tadtzdh@dearto.cn
Copyright© Tai'an Detu Automation Instrument Co., Ltd. Lu ICP 14024757-1 